If you’re interested in the idea of a DIY outdoor kitchen… one of the most important aspects to research will be your finish material.
What’s the best and easiest way to finish your BBQ island exterior?
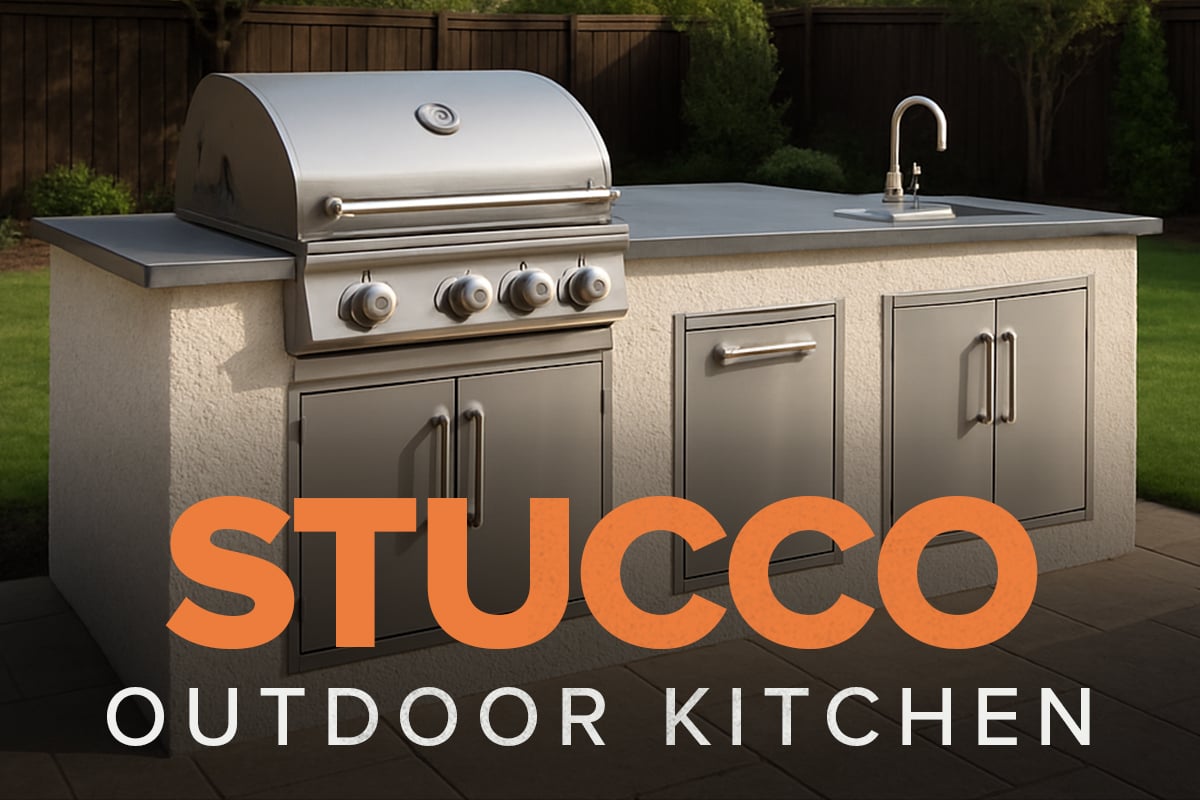
In this search… you’ve probably become interested in building a stucco outdoor kitchen.
It’s been a mainstay island finish for decades, so it’s not surprising you’ve become curious about it!
That said… there’s a lot more to a stucco outdoor kitchen than meets the eye. In this article, we’ll cover all the details you need to know, so you can decide if this island finish is right for you (or not).
Let’s hop in.
How to Stucco an Outdoor Kitchen
Before we discuss all the potential pitfalls and complications that come with outdoor kitchen stucco… let’s begin with a general overview of how the process is done in the first place.
For starters, you’ll need to have a metal outdoor kitchen with cement board already framed out. Whether you’ve done this entirely DIY or with a ready to finish kit… the process will be the same.
Some people online will just go ahead and apply stucco directly to the cement board. This is not the correct process! If you want any hope of a nice finish… you’ll have to closely adhere to the following process.
1. Prepare Your Cement Board
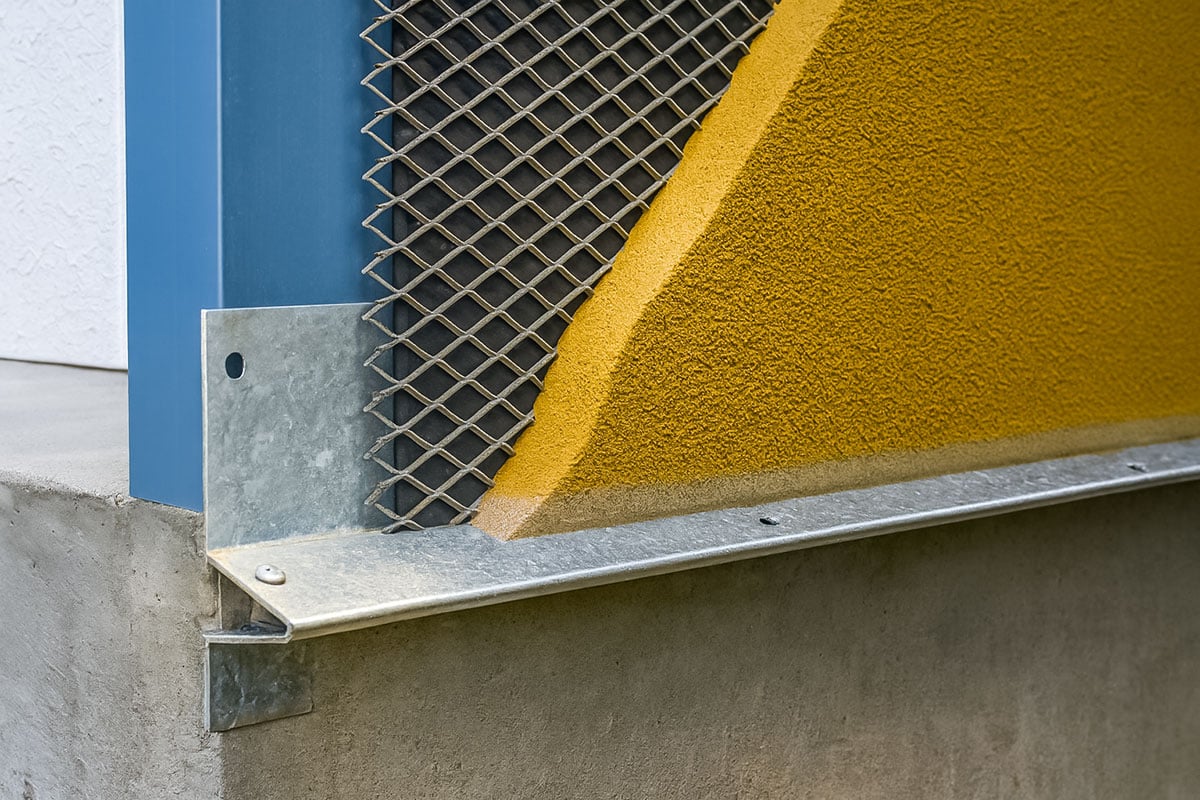
First and foremost, you’ll have to properly prepare your cement board layer. This involves adding metal drip screeds to the bottom perimeter of your island, and screwing mesh onto the corners.
Why?
Well, despite being frequently used in outdoor applications… cement board is extremely susceptible to moisture. Adding a metal screed will help provide a little added protection, and help you get a cleaner finish.
Applying mesh onto the corners of your island is needed to help your fresh concrete adhere to the cement board.
Once you’ve done that, it’s off to step two.
2. Apply Base Layer of Mortar
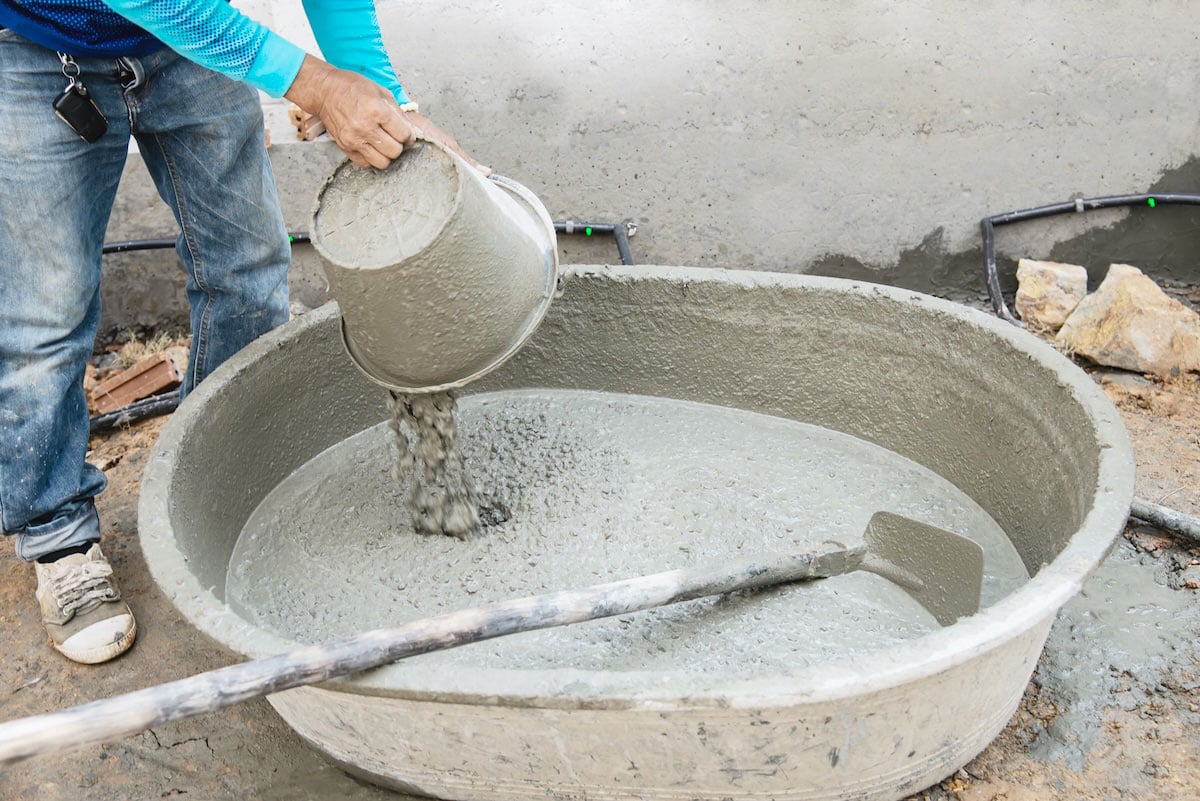
At this stage, you’ll have to mix up a base layer of mortar. This will ensure your stucco has a nice, textured surface to adhere to.
In addition to the mortar, it’s a smart idea to add concrete bonding adhesive or stucco adhesive to the mix. This will ensure your mortar sticks nicely to the cement board so you don’t end up with adhesion issues later on.
Using a trowel, you’ll apply a layer of mortar across the entire surface of the cement board… taking care not to get in the way of appliance cutouts or countertops.
While this layer is still wet, you’ll need to complete step 3.
3. Place Mesh for Next Layer
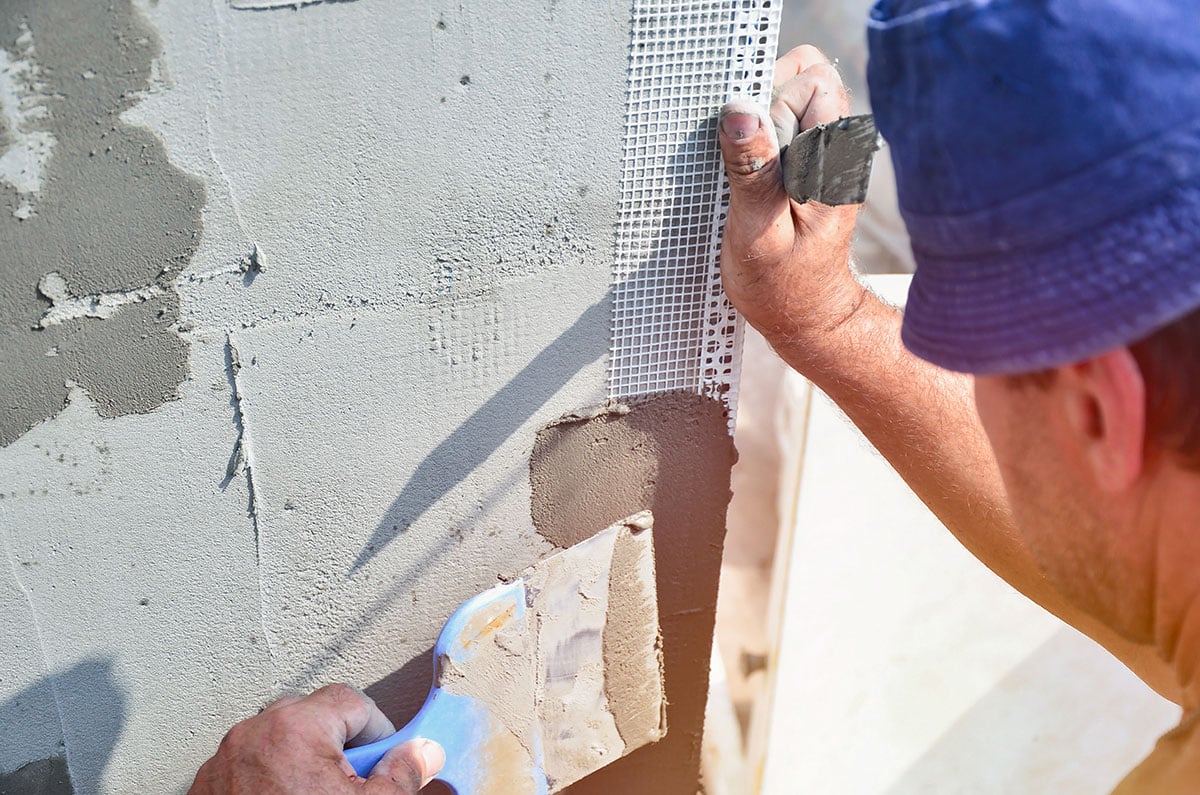
As you may have taken notice of so far… proper adhesion is important! If your layers aren’t sticking together, then your outdoor kitchen stucco finish will be a disaster.
While the mortar base layer is still wet, you’ll need to apply mesh to the entire exterior of your island. This will provide “grip” for your stucco layer to stick onto.
Once you’ve applied the mesh, let the mortar cure. Then, you can cut away any excess mesh that may be covering appliance cutouts and the like.
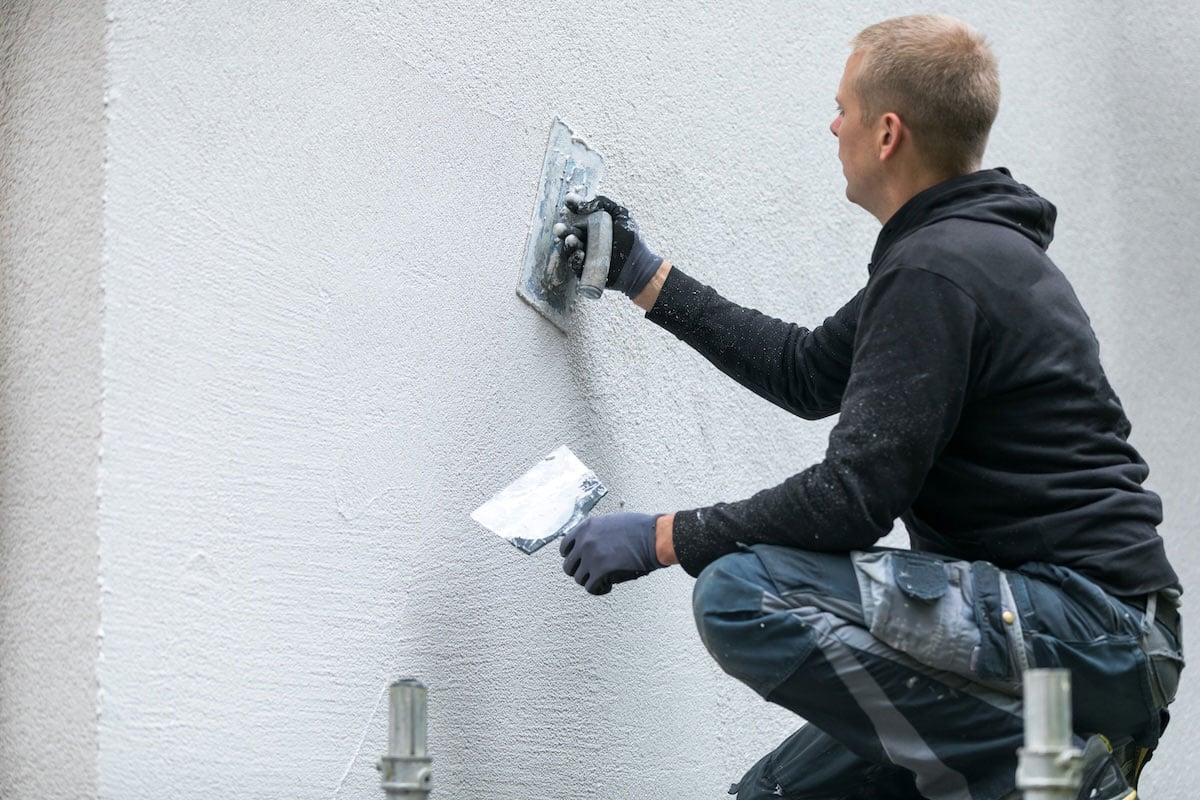
4. Apply 2 Layers of Stucco

Finally, it’s time to apply your outdoor kitchen stucco.
Mix up a batch of stucco in your desired shade… and begin to apply carefully with a trowel.
Once you’ve applied your first coat, you’ll need to go over it with a float for a smooth finish.
After the first layer has cured… you’ll repeat the same process for the second layer.
When the final layer has completely dried, your outdoor kitchen with stucco will be complete!
Want to Design Your Own Outdoor Kitchen?
Is Stucco the Best Outdoor Kitchen Finish?
If the steps outlined previously make you feel 100% confident in your ability to do stucco for an outdoor kitchen… hold your horses one moment!
The process we just outlined for applying stucco to an outdoor BBQ island is a general overview… and there’s more detail involved than what we’ve mentioned.
In light of that, here are a few additional considerations before you go all-in on stucco.
It’s Time Consuming, Laborious, and Technical

Although the steps involved in making a stucco outdoor kitchen are easy to understand on their face… actually doing the work yourself is an entirely different ballgame.
The reality is, making an outdoor stucco kitchen is a difficult project to pull off… especially if you don’t have experience.
Painstakingly applying each layer of material takes a long time, and requires a great deal of precision. Depending on the scale of your outdoor kitchen design… it could take days, or even weeks, to get the finish completed.
The process of applying stucco is also laborious and exhausting. You’ll be spending a lot of time on your knees, or hunched over in uncomfortable positions.
And on top of the physical strain, concrete and stucco might seem like unassuming materials… but the world of concrete is actually highly technical.
Here’s just a few things that are critically important when it comes to applying mortar and stucco properly:
- The hydration level of your mortar and stucco mix
- The current weather and broader climate considerations of your location
- Proper dampness of your 1st layer of stucco before applying the 2nd one
- Smoothing out your stucco before it cures too much
That’s not even getting into all the nitty-gritty details, either. All of these quirks of how concrete works are extremely important to understand… and all the variables change, literally, by the day.
So if you’re not familiar with how concrete works and how to “go with the flow” as the situation changes… you might find yourself incredibly frustrated with making a stucco grill island.
Exceptionally Difficult to get a Professional Finish
Time and technicality aside… the skill cap required to get a nice, smooth finish is also extremely high.
Sure, the professionals make it look easy to get a consistent finish with stucco. But that’s because they’ve been at it for a long time, and they know how to manipulate the material to their needs.
More than likely, if you’re building a stucco outdoor kitchen… it’s not something you’ve personally worked with before. You won’t know how to masterfully create a smooth finish with your stucco.
So with that said, the most realistic outcome you’ll have is lots of bubbles and inconsistencies. And unfortunately… most stucco is highly unforgiving when it comes to hiding mistakes!
If you’re not confident about your ability to create a professional finish with stucco… this one might be best left to the experts.
Questionable Long-Term Durability in Most Climates
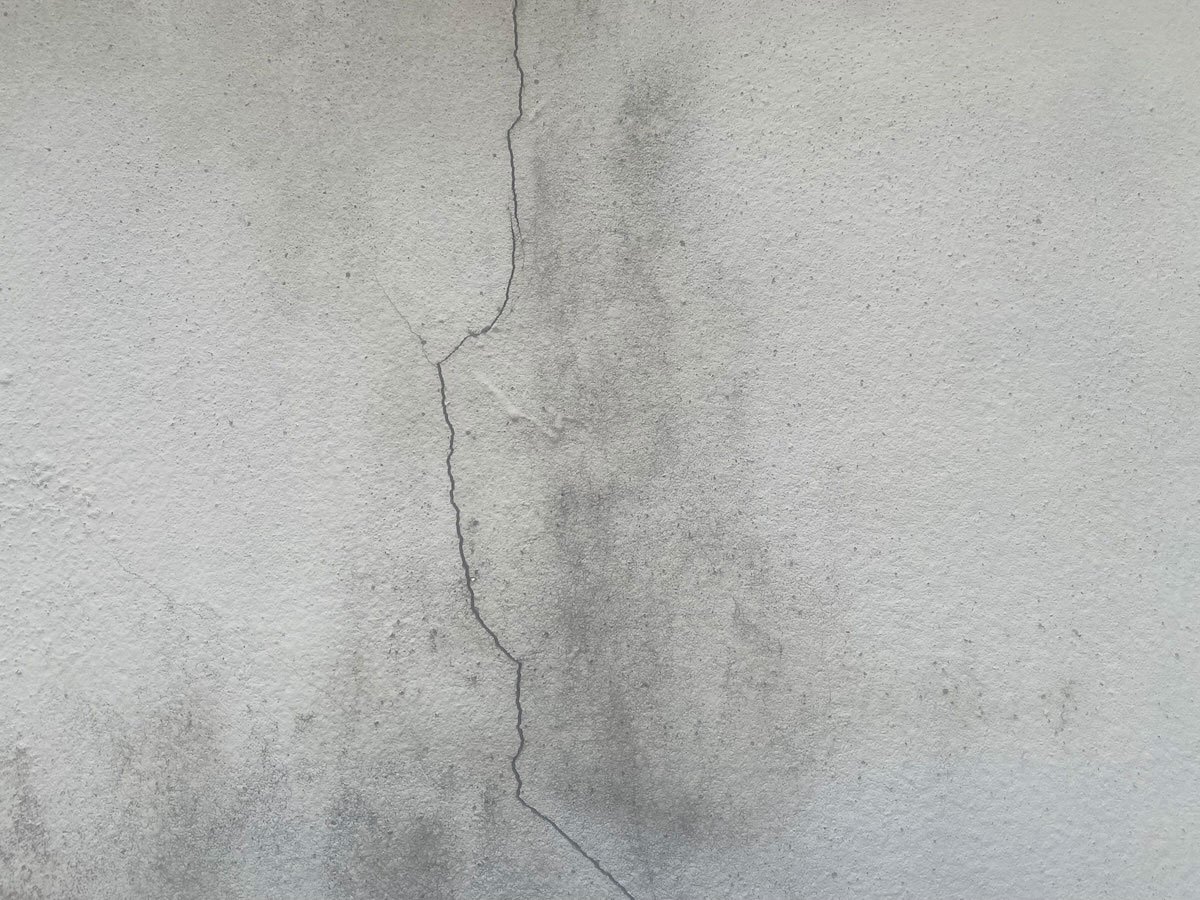
To add insult to injury, a stucco outdoor kitchen isn’t a great material choice in most climates.
Even though concrete in and of itself is a strong, sturdy material… the application of using thin layers is what really causes a problem here.
If you live in an area with high humidity, harsh winters, or frequent freeze/thaw cycles… you may want to steer clear from stucco.
Moisture and frequent temperature fluctuations put stress on each layer of your outdoor kitchen, causing them to expand and contract at different rates.
This constant shifting puts outward pressure on your stucco outdoor kitchen finish… leading to chipping and cracking over time.
It’s unsightly and a pain to fix, yes. But there’s even more to it than that.
If you’re not constantly making repairs on the stucco, eventually, moisture will be able to access the metal framing of your outdoor kitchen. Over time, these frames will begin to rust and corrode… causing catastrophic structural damage to your island.
That’s a scary thought!
Unless you live in a climate with dry, arid weather and limited rain… it may be best to look into a different finish option.
Speaking of which…
A Neat Alternative to the Stucco Look
Here’s the thing. After learning about how much is actually involved in making a stucco outdoor kitchen… you may realize you’re in over your head on the project.
But there’s still a part of you that doesn’t want to give up on the stucco look.
Well, there is a way to have your stucco outdoor kitchen cabinets… and enjoy it too. (Without all the work!)
A great alternative to traditional stucco would be our line of modern concrete outdoor kitchen finishes.
It still provides the sleek, clean look of a smoothly-finished stucco… but without all the hair-pulling frustration.
Let’s look at a couple faux stucco outdoor kitchen ideas.
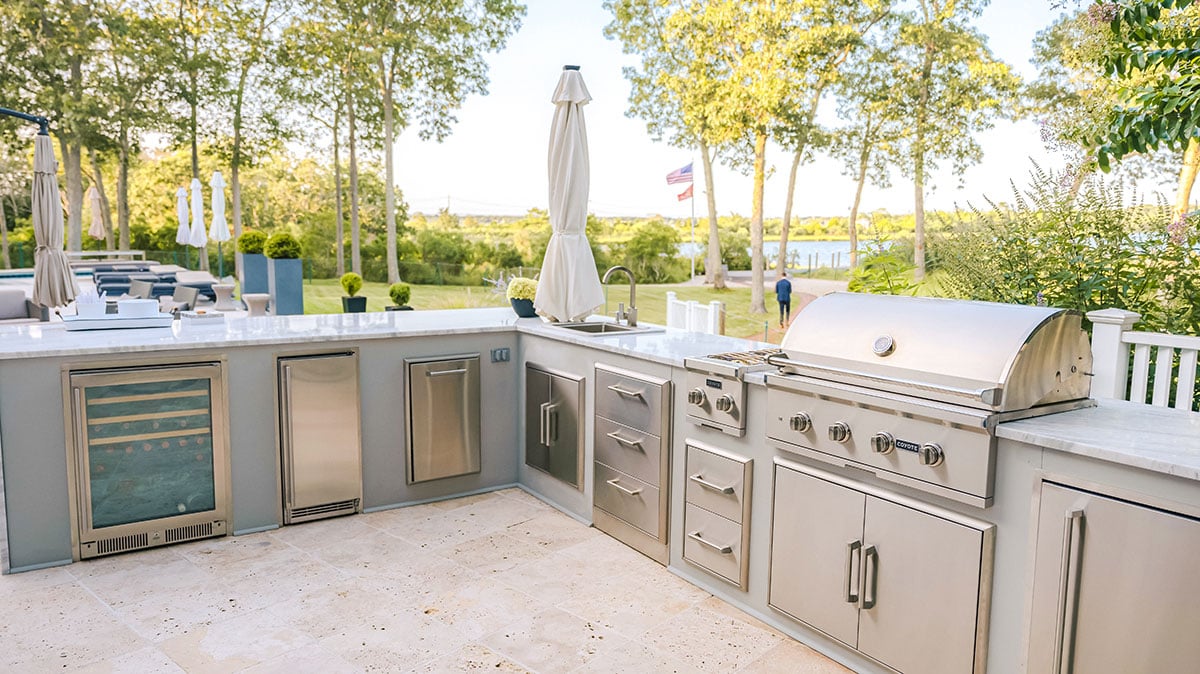
Modern “Stucco” Outdoor Kitchen on Deck
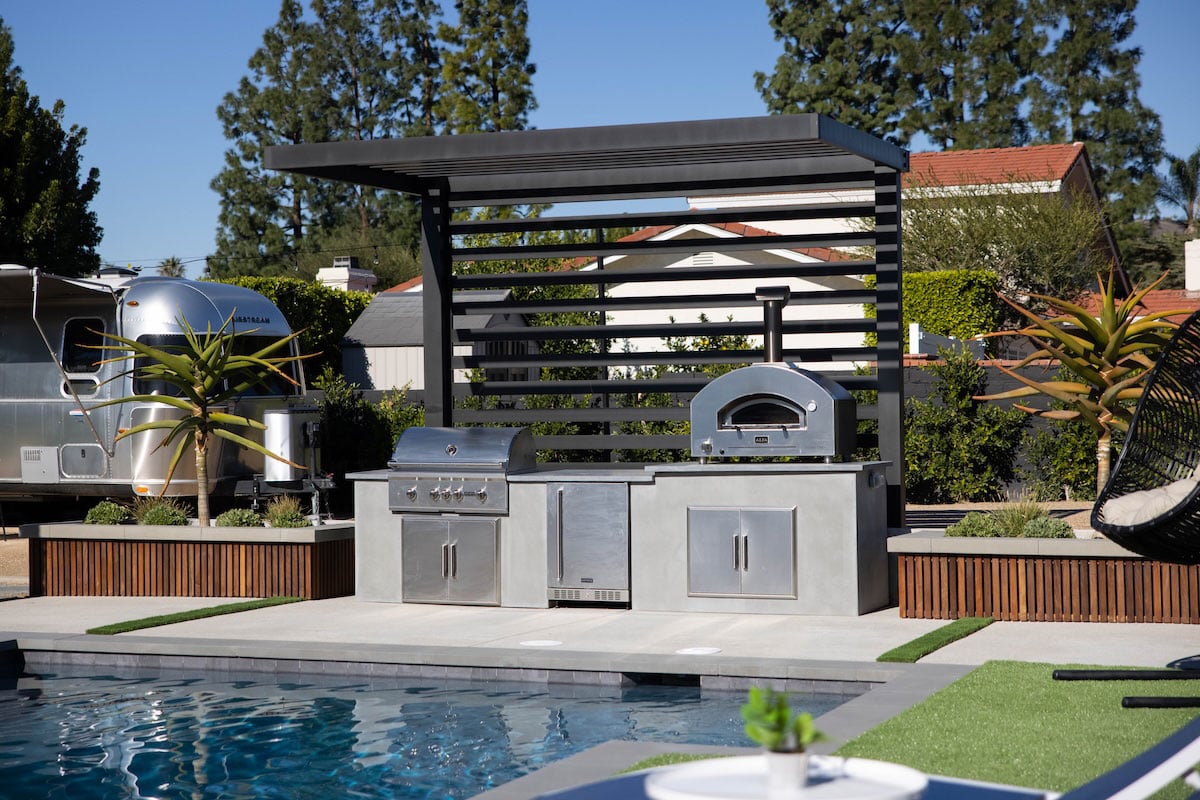
This outdoor grill island, finished in modern concrete industrial, is exactly the kind of look stucco-lovers are seeking!
The smooth, clean, matte finish is exceptionally pleasing to the eye… and there’s no bubbling or imperfections to speak of!
And paired with a set of granite outdoor kitchen countertops, the cool gray hue is absolutely timeless.
This “stucco” outdoor kitchen is packed with premium 304 stainless steel appliances, too.
You’ll find a large natural gas BBQ grill, 2 sets of access doors, and a power burner with storage underneath.
All in all, this outdoor kitchen island is ready for your next BBQ party!
Feeling Inspired?
Bright “Stucco” Outdoor Kitchen with Pizza Oven
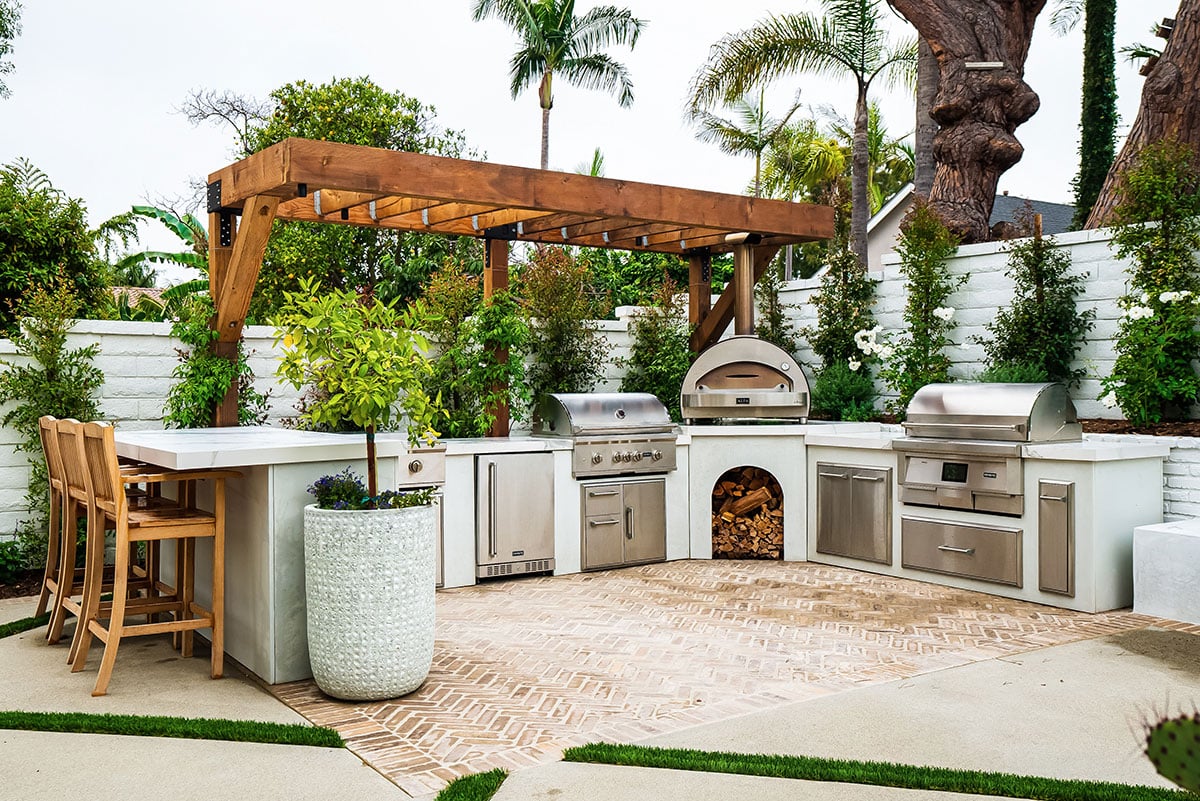
If you’re drawn to the look of a stucco outdoor kitchen… it’s likely you’re especially enamored with the aesthetics of a bright white stucco island.
It’s fresh, bright, and open… inviting a world of potential in your outdoor living space.
There’s a lot to love about a white stucco outdoor cooking area. And you’re in luck… because this modern concrete bright outdoor kitchen finish is a great lookalike!
Just like the industrial shade previously featured… this modern concrete bright has a lovely smooth and matte finish.
For appliances, this outdoor kitchen features drawer storage, access doors, a single pull out trash bin, built-in gas grill, and an Ooni pizza oven. (All that’s missing is an outdoor refrigerator!)
And to “top” it all off… the set of clean edged concrete countertops provides a nice, gentle contrast to the bright modern finish.
Overall, if you’re looking for an alternative to true stucco… this is an excellent option to look into!
Get Started with Your Stucco Outdoor Kitchen
If your interest in a modern concrete outdoor kitchen has been piqued… it may be time to consider working with RTA Outdoor Living for your project!
These high performance concrete outdoor kitchens are made from solid, concrete panels with the finish already included. All you need to do is bolt the panels together, place the countertop, and slide in appliances.
There’s no mess and no futzing around with wet cement for days or weeks. You’ll be able to install your outdoor kitchen in a single day… and marvel at the beauty of a clean, smooth finish that’s already been done for you.
But if you truly have your heart set on a traditional stucco finish… we may still be able to assist you. In the past, some RTA customers have either (a) applied their own scratch coat and stucco finish or (b) painted a modern concrete finish in their desired color.
These are special requests that go outside of our standard offering… so each request is considered on a case-by-case basis. If this is an option that you’re interested in, speak with one of our Design Experts for more details.
No matter where you stand with a stucco outdoor kitchen… now is a great time to explore our free outdoor kitchen design tool.
By playing around with different layouts, appliance options, and finishes… you can further refine what your ideal outdoor kitchen looks like.
It’ll only take a few minutes of your time, and the exploration is well-worth it!
Have fun designing… and we’ll be in touch soon.